How to Verify Your Facebook Business Account Manager

After the latest iOS update, Facebook has been deactivating business accounts that haven't been verified. Additionally, Facebook requires users to verify their accounts to advertise.
Here are several ways to get your accounts ready to advertise on Facebook’s ads platform.
Request business verification
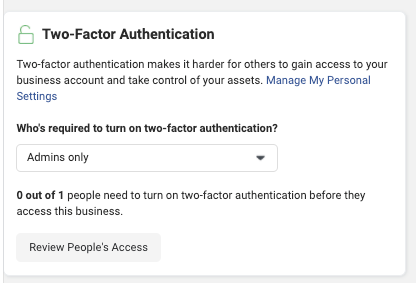
Set up 2-factor authentication (2FA)
- Activate 2FA for admin only. This step is crucial as admins have the most control over your business account.
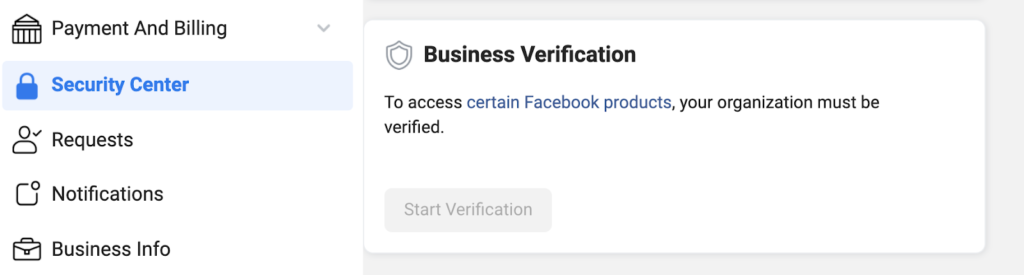
- Click on “Start verification.” If this option is not available, go to the What to do if the business verification option is unavailable.
Important note: Not having 2FA on can cause prior verification to be revoked even if your business account manager has already been verified.
Fill in your business details
Enter your business details with the information from your business license. You might be asked to verify the business’ address or phone number.
Submit business documents
Step 1: To verify your business's legal name, you'll have to upload official documents in JPG format. These documents must show your company's legal name and your business’s official mailing address or phone number. You can use any of the following:
- Articles of incorporation
- Business bank statement
- Business license
- Employer identification number (EIN)
- IRS SS-4 (EIN Assignment Letter)
- IRS 147c (EIN Confirmation Letter)
- Taxpayer identification number
- Organization’s phone or utility bill
The requested documents may vary from country to country.
Step 2: You'll be receiving a verification code via email. This process usually takes from 5 to 10 business days. It's essential to monitor your application in the Security Center, and Facebook may ask you for more documentation.
Note: Make sure you are only using one unique entity per business.
For Influencers
If you're an influencer, you'll have to verify your business account manager by submitting any of the following personal documents:
- A government-issued photo ID that shows your name and date of birth
- Driver’s license
- Passport
We call this the ID Facebook Checkpoint, and it shouldn't take more than 48 hours to be reviewed.
Check your business verification status
If your business verification request is denied or revoked, proceed to the next section.
Note: If you've been notified via email/support that your business manager is verified, but the status still says unverified, open a ticket in Facebook’s Help Center. We advise you to upload screenshots and explain the situation.
Example: My company recently got verified (I got a notification via email and Facebook support inbox), but my status still says “Unverified” business on Business settings. Could you help me fix it, please?
Reasons why your Facebook business verification is getting rejected
- The business's legal name doesn’t appear on your website. Your business's legal name should match your website's name. If your business holds multiple brands, you might want to create a subdomain and include business details tailored specifically for that brand.
- Business details errors. Double-check your business details before submitting; you might misspell or skip details. Watch out for typos!
- Admins don't have 2FA on. This step is crucial and might be why you can’t verify your business manager.
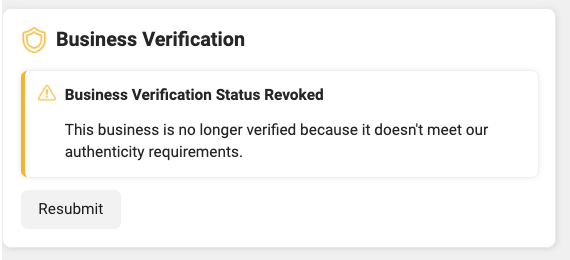
What to do if your business verification gets revoked or denied
Step 1: Contact Facebook via Facebook’s Help Center Chat and request an internal review. Facebook will review the information you submitted and let you know if more information is needed.
Once you have all information ready, hit Resubmit and complete the form. Double-check that all the entered data is correct.
What to do if the business verification option is not available
If your verification button is grey, you'll need to take extra steps to be able to verify your account manager. Here is another way you can do it.
Important note: Before proceeding, double-check that 2-Factor Authentication is set up for admins only.
Create an App
Create a New App ID. After you've done this, you should be able to hit the "Start verification" button.
If creating an App didn't work, connect to Facebook’s Help Center Chat and request an internal review.
Verify your business’ domain
Verifying your domain can help verify your Facebook business manager when other methods are not working out.
There are three options to verify your domain. You can choose between uploading an HTML file, adding a meta tag to your domain homepage’s <head> section, or adding a DNS TXT record. Here’s how you can proceed with any of the options you choose:
HTML File Upload
To verify your domain using the HTML file upload, follow these steps:
- Go to the settings tab on the Business Manager and click on Domains.
- Then click add a new domain. The domain will be added to your assets
- Select the HTML file upload method.
- Download the HTML verification file.
- Upload the file to the root directory of your website. You’ll see that it is uploading at the link provided in the HTML File Upload tab.
- Click the Verify button at the bottom of the HTML File Verification tab for the selected domain.
- Leave the HTML verification file in your website's root directory as it may be checked periodically for verification purposes.
Note: You’ll need admin access to your website's root folder to choose this verification method.
Meta Tag
To add a meta tag to the <head> section of your domain home page, follow these steps:
- Click on your selected domain's Meta Tag Verification tab to get the meta tag.
- Add the meta tag containing the verification code to the <head> section in the HTML of your domain home page.
- Visit your domain home page and view the HTML source to ensure that the meta tag is there.
- Go back to your Facebook Business Manager and click Verify at the bottom of the Meta Tag Verification tab for the selected domain.
- Leave the meta tag on your domain home page, as it may be checked periodically for verification purposes.
DNS TXT Record
To verify your domain using a DNS code, follow these steps:
- Go to the settings tab on the Business Manager and click on Domains.
- Then click add a new domain. The domain will be added to your assets.
- Select the DNS verification method.
- Click on start domain verification.
- Copy the verification code text to your clipboard.
- Log in to your domain registrar and navigate to the DNS record settings page.
- Click add a record and select the TXT type.
- Then type facebook-domain-verification=.
- Paste the code after the “=” that you copied from the Facebook Business Manager.
- Click add record. You’ll have to wait at least 30 minutes for the verification to be accepted and for it to propagate.
- Go back to your Facebook Business Manager and click verify.
Now that you’ve already verified your business account manager, it’s time to install the Facebook Pixel on your website and improve your Facebook Marketing.