The Ultimate Guide to Google Shopping
Google Shopping offers another fantastic opportunity to market your ecommerce store. Put your products front and center where shoppers are looking most - on Google's search engine results pages.
Getting Started with Google Shopping
What is Google Shopping?
Google Shopping is a Google ad service with which retailers can pay to feature their physical products at the top of search result pages. Contrary to text-based Google ads that appear based on keywords, Google uses product data uploaded by retailers to display Google Shopping ads. Shoppers can compare and shop for products by browsing these ads that include a product’s image, retailer, and price.
Google Shopping ads appear in Google’s standard search results, on the Shopping tab, on search partner websites, in the price comparison Shopping services and apps, and on Gmail, YouTube, and Google Display Network. This already-extensive list is still growing, so advertisers have more opportunities to reach shoppers.
Learn more on our blog: What is Google Shopping?
How to Prepare Your Chip Account for Google Shopping

Before registering a Google Ads account, make sure that your Chip store is set up and complies with Google’s requirements. Doing so not only ensures that your Google Shopping efforts will run smoothly but it also helps reduce the chance of your account getting suspended. Our checklist will walk you through your product categories, custom domain, camapign details, promotions, social media accounts, and account settings.
Learn more on our blog: How to Prepare Your Chip Account for Google Shopping
How to Access Settings on Google Ads and Google Merchant Center
Each time you grant access to your Google Ads Account, you'll be able to select which features the user can impact by assigning an access level. Chip will share with you the access permission level in Google Ads:
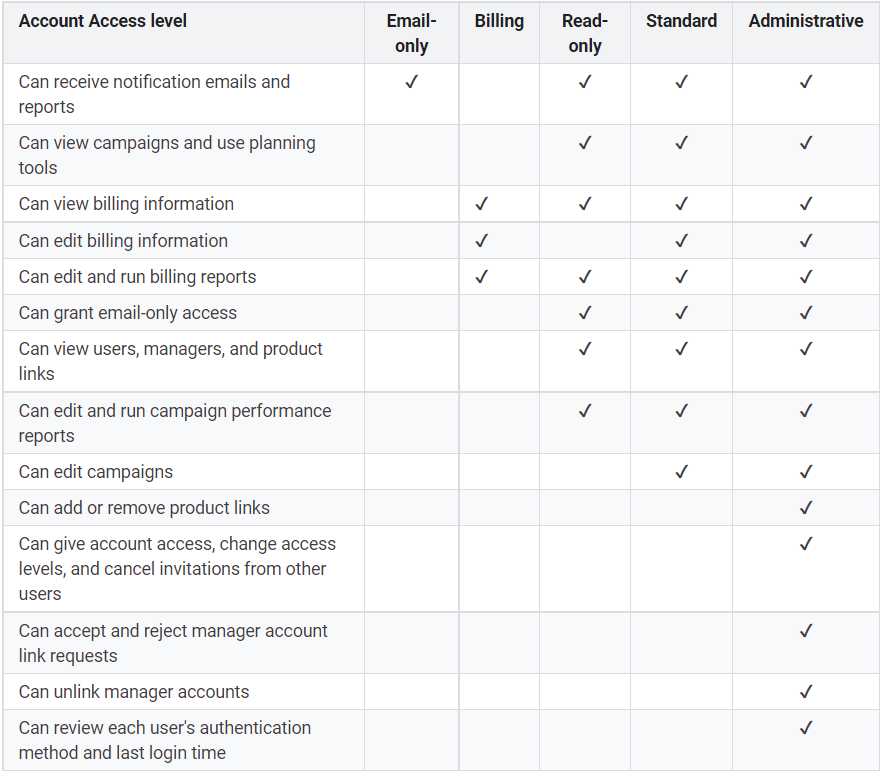
With the table above, you see that you can have most of the permissions in your Google Ads account with admin level access. With Standard Permission, you can't add or remove any product links or give access to other users in this account.
For Google Merchant Center (GMC), account admins can specify different access levels per user, and each user may receive other types of emails.
- Standard: Ability to sign in to GMC and access everything in the account, except the "Users" tab and the "Merchant Center programs" tab.
- Admin: Standard account access, plus the ability to add, delete, or edit user roles in the "Users" tab.
- Email contacts: No account access, but will receive emails based on preferences.
Every type of user is eligible for the user attribute "Verified website owner." If this label appears next to a user's name in the "Users" list, it means this user has verified their account's website and can claim it or has already claimed it.
Building Google Shopping Campaigns
How to Select Product Categories for Shopping Campaigns
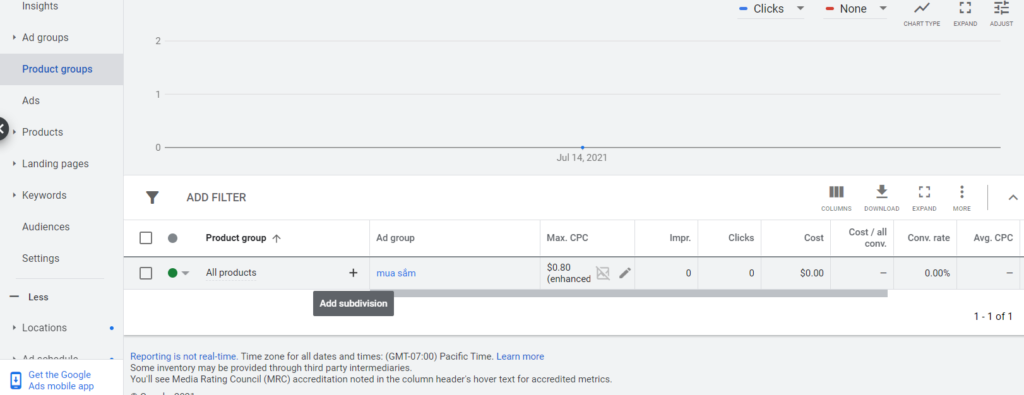
When you first create a Shopping campaign, you'll have one ad group with one product group called "All products" that includes your entire inventory. Typically, you will upload tons of products into your Shopping Campaign, and each product will have a different price or priority.
To optimize your Shopping Campaign more efficiently, you can consider subdividing your products into specific product groups from All Products.
How to subdivide your product group
Step 1: Select the Shopping Campaign. Click the ad group that contains the product groups you want to edit.
Step 2: Click Product groups in the page menu to reach the product groups page.
Step 3: Locate the product group you want to subdivide and click the + symbol next to its name. For example, here, you should click the + next to the "All products" group.
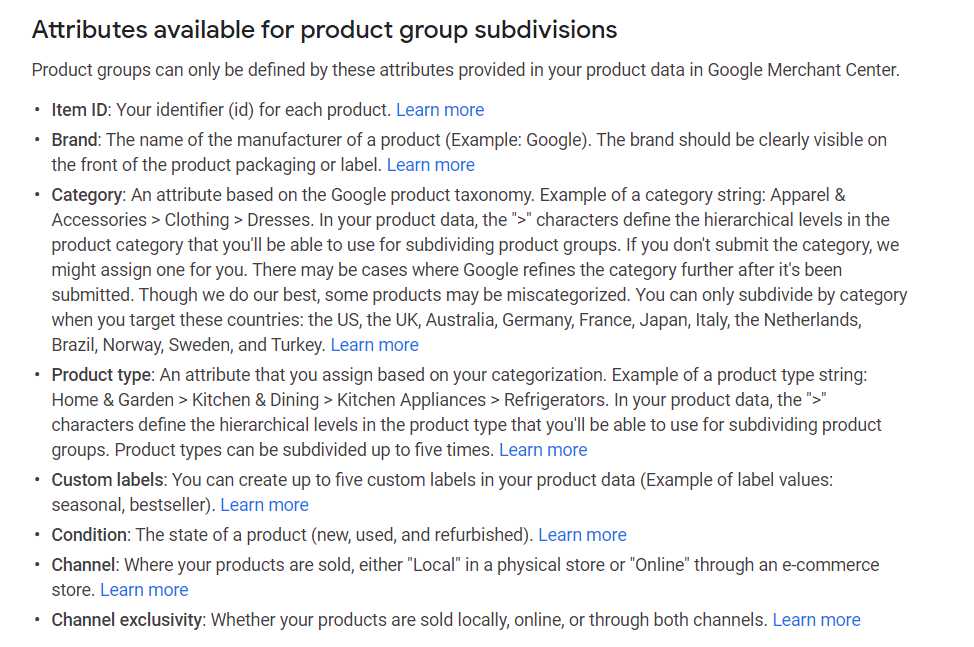
Step 4: In the window that appears, select the drop-down menu next to "Subdivide [All Products] by" and choose a product attribute to define your new product group.
- For example, you might see "Subdivide 'All products' by Category." This means that you'll subdivide the "All products" product group by a category that you choose.
- If you want to use more than one attribute to define your product group, finish creating the current subdivision and repeat the steps above.
Step 5: After selecting the attribute to subdivide by, you'll see a list of possible subdivisions. Next to each one of them, click the checkbox to add the subdivision to your product group.
- For example, if you sell shoes and select "Category," then you might see these possible subdivisions: "Sandals," "Dress shoes," and "Boots."
Step 6: Click Continue to review bids once you're done creating subdivisions. You'll be able to review and edit the bids set for any new product groups you created. If you click Save without reviewing bids, any new product groups you created will use the default bid from the product group you subdivided instead.
- For example, you subdivided "All products" into two new product groups: "New" and "Used" conditions. The default bid for those product groups will be the same as "All products," unless you edit them. You can click "Continue to review bids" to make changes or change the bids any time later on, on the product groups page.
Step 7: If you click Continue to review bids, you can set the bids for each product group using the "New max. CPC" column.
Step 8: Click Save to confirm your product group subdivisions and bids.
Note: If you want to subdivide a product group with multiple attributes, you should finish subdividing one attribute first, then continue to subdivide the second attribute from the product group you created with the previous attribute. For example, suppose you want to create a product group with the attribute Product Type (T-Shirt) and Product Category (Long Sleeve). In that case, you will first create a product group with the attribute Product Type, and from this Product Group, you will subdivide again with the attribute Product Category.
Optimizing Google Shopping Ads
Optimization for Shopping Campaigns
To run Shopping Ads efficiently, you need to structure effective campaigns, set your best bids, and optimize your strategy to achieve your marketing objectives in the right place at the right time. To help you, Chip will share the best practices to set up your campaigns from the beginning to turn them into winning campaigns!
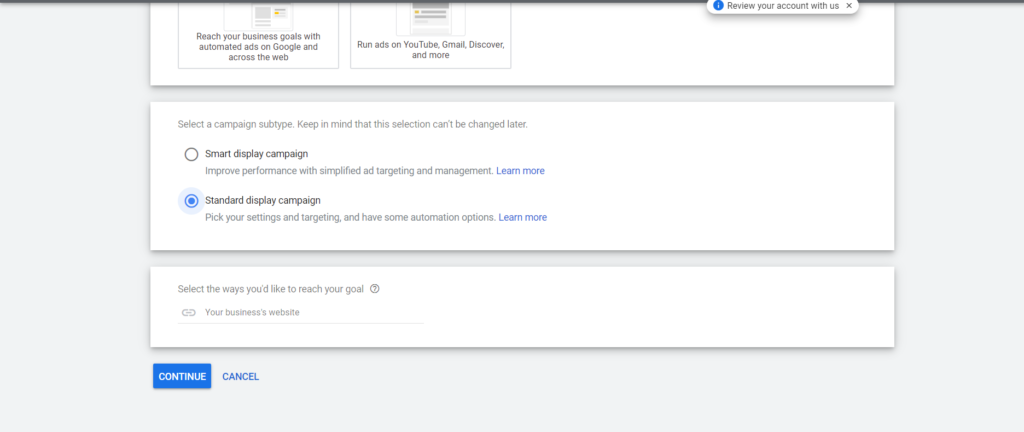
1. Standard Shopping
Reason: If your account is new, the system won’t have enough data to optimize your campaign using the automated bidding strategy, so you need to choose the Standard campaign option to collect data first.
How to setup and optimize your Standard Shopping campaign:
For the setup instructions, please read this article. Here are some tips to help you optimize your standard shopping campaigns:
- Shopping campaigns use product groups. To select which products you want to bid on in a given campaign, you should subdivide your inventory into customized product groups using any product attributes (such as category, product type, or brand). This way, you can set up the correct bid for each product group. For example, you can subdivide one product group for seasonal products (Independence Day, Back to School, etc.) and set a higher bid for this group during its season. When the season ends, you can lower the bid for this product group or pause it.
- Negative keywords can be an effective tool to avoid showing your products to the wrong shopper. Therefore, you should check the Search Term report in your campaign daily and add the irrelevant search terms to the Negative keywords list to save you money.
- Set your budget and bid reasonably to ensure your bid won’t be too high or too low, and the budget is enough to reach more customers. Your Shopping Campaign will have many products; if your budget is too low, your campaign will run out of funding after a couple of clicks, and you will miss the chance to show the product to the users who are more likely to make a purchase.
How long do I have to use Standard Shopping until I can switch to Smart Shopping?
Well, it’s hard to pick an exact amount of time for running Standard Campaigns because it depends on how much data your campaign can collect. But usually, it takes around 30 days to collect enough data. So make sure that you don’t switch to a Smart Campaign until you have at least 15 Conversions within the last 15 days. Also, it would be best to optimize the cost per conversion or ROAS (return on Ads spent) before using Smart Campaigns to avoid the long cold-start time when using the Smart strategy.
Additional tips:
- You can use Dynamic Remarketing Campaigns at the same time you are running Standard Campaigns to push sales. Dynamic Remarketing will retarget people who already viewed your products or already added the product into their carts but didn’t purchase it yet. They are more likely to complete a purchase on your website. Since you have to use Enhanced CPC when creating these campaigns (because you do not have enough data to use other bidding strategies), we recommend you only target two audiences (Product Viewers and Shopping Cart Abandoners) to save money.
- You can also use Dynamic Search Ads to increase the traffic and sales from your account to make sure you will have enough data as soon as possible to switch to Smart Shopping Campaigns.
2. Smart Shopping
Note:
- Only use Smart Campaigns when your account has enough data (15 conversions within the recent 15 days)
- Avoid making a lot of changes (especially during the learning period). If you need to optimize your campaign, only make changes within 10-15% of your current settings (bid, budget).
- Do not use both Standard and Smart Shopping for the same product at the same time. Because the system might only show this product in one campaign, and the other will be affected.
- We suggest you use the tROAS bidding strategy for Smart Campaigns to optimize the conversion value.
How to set up and optimize your Smart Shopping campaign:
To learn more about how to create a Smart Shopping campaign, read this article.
How long is the learning period?
It depends on how much data you have. It usually can take up to 14 days for the learning period and 7 days where you can observe and make changes to improve your performance. The performance might not be great during the learning period, but you should consider not making any changes during this time.
In conclusion, optimizing your campaigns from Standard to Smart Shopping Campaigns might take at least two months. During this time, you need to optimize and make all the changes necessary in order to receive more conversions at a lower cost in the future.
Bidding Strategy for Google Ads
In this section, Chip gives you the scoop on the best bidding strategies you should consider using for your Google Shopping Campaigns.
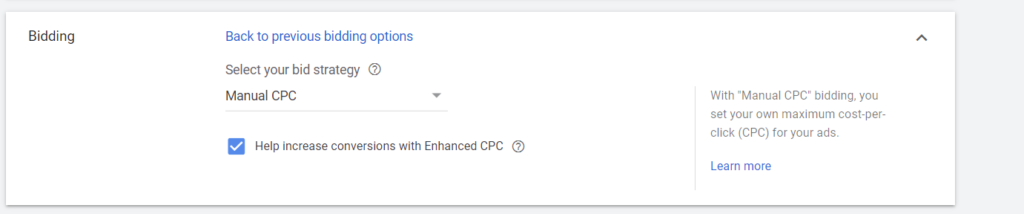
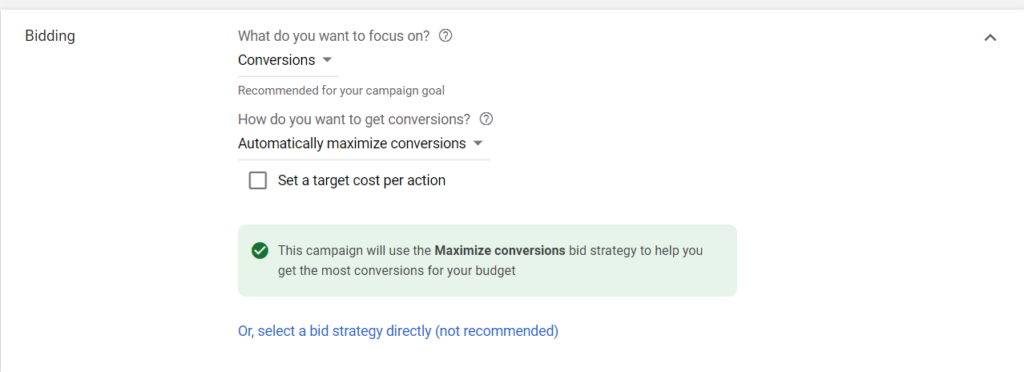
1. Enhanced CPC for a new account, without conversion data:
You can choose this bidding strategy and optimize for Conversions/Conversion value for new accounts that do not have enough conversions data. This type of bidding does not require much data to run, so you can use this one and collect more data for your campaign, then change to another bidding strategy in the future.
To use this bidding strategy, you can go to Settings > Bidding > Change Bidding Strategy > Or select a bid strategy directly (not recommended) > Manual CPC and tick the box Help increase conversions with Enhanced CPC.

2. Maximize conversion value:
This bidding strategy requires 30 Conversions within 30 days in order to work efficiently. It will use your campaign budget to set the bid and optimize your campaign to get as many Conversion values as possible. To optimize it, you can adjust your campaign budget.
Remember that sometimes your spending/CPC will be super high with this bidding strategy because there is no bid limit. The system tries to get the conversion for your campaign based on your budget. The default ROAS for this bidding strategy will be 200%. It means with 1$ on ads spent; the advertiser will get 2$ in return (in theory).
3. tROAS:
This bidding strategy is a good choice for sellers who wants to run Smart Shopping because the system will optimize for conversion value in your campaigns. It would be best if you considered having at least 15 conversions in the last 15 days to use this bidding strategy.
Make sure only to adjust +/- 20% maximum of your current tROAS. Also, we suggest tracking for at least 5-7 days before making any other changes related to tROAS since every significant change may affect your performance. Learn more about this strategy in this article.
4. Target CPA:
This bidding strategy is similar to tROAS but used for standard campaigns instead of Smart Shopping. You will set your target CPA (Cost per Acquisition) so that the system can optimize your bid based on your target.
For example, you set your target CPA at $15, and then the system will try to set the bid so that your cost per conversion is $15.
Note: The target CPA that you set is not always guaranteed. This is the target that the system will try to reach. But, if your CPA is too low, ads might not work, or it will drop after trying but will not meet your target. Also, you should set your budget more than 10 times your target CPA so the system can optimize your campaign efficiently.
In addition, if your account is eligible, you can also use the Target CPA bidding strategy with the Pay for conversion option in Display Campaigns. For example, if you set your Target CPA to $10 and you get 10 conversions during a month, you would be billed $100.
Note:
- Pay for conversions uses more flexible budgeting rules because the number of conversions varies more than the number of clicks in a given day. As a result, if you pay for conversions, your daily spend may exceed your average daily budget by more than two times. This gives Smart Bidding room to optimize better across your campaigns.
- The initial monthly budget of a campaign that uses pay for conversions is based on the average daily budget that the campaign starts the month with, multiplied by 30.4. If the average daily budget is changed during the month, this monthly budget no longer applies and will be replaced with a new budget based on the remaining days in the month.
- Pay for conversions campaigns will respect monthly budgets, but sometimes controlling it may not be possible. In rare circumstances, this may result in monthly budgets being exhausted before the month's end.
Requirements:
- Don't include the "Import from clicks" and "Store visits" conversion actions from your account. Since the "Purchase" conversion that Chip set up is already eligible for this strategy.
- Your account must have more than 100 conversions in the last 30 days to use the Pay for conversions option. You'll also need 90% of your conversions to happen within less than 7 days after someone clicks your ad.
- You can set a Target CPA of less than $200 USD (or equivalent in local currency) for your campaigns and ad groups to use the Pay for conversions option.
Please refer to this article for more information.
Bidding Strategy for tROAs
For Google Shopping, your products will have multiple ranges of price for each type. For this reason, you need to set different bids to compete with other advertisers and bring as much conversion value as possible to your business.
For example: With a T-shirt with a $30 price, you have $20 of profit, but because the price is high, you need to set a higher bid ($0.5) to compete with other advertisers. But for a Phone Case with an $18 price, you get $10 of profit, and you only need to set the bid at $0.1 to get your ads working.
But let’s suppose you have 1,000 products at different prices. How can you manually set a bid for each price range?
A Target ROAS (tROAS) bidding strategy will be the answer to this question. Using the conversion value you set up for your products on the website, the system will learn and set up the bid based on the conversion value to optimize this data in your account.
How does it work?
To use this bidding strategy, you need to set up a Conversion value on your website for each product. Is it hard to set up this conversion value? Don’t worry! Chip already set it up for you, so you only need to learn to use this bidding strategy efficiently.
Formula:
ROAS: Return on Ads spent
tROAS = (Conversion Value/ Cost)*100%
For example, with a 200% revenue for $50 spent on advertisement. You will get the total of the conversion value with the following formula:
tROAS = (Conversion Value/ 50)100% = 200% => Conversion value = 50*2 = 100
Or, if you want to get 300% revenue for every $1200 in Conversion value, the cost you need to spend will be:
Cost = (Conversion value/tROAS)*100 = 1200/300 = $400
With this formula, the system will optimize each product to get you the expected ROAS. For example:
- With a $30 T-shirt, you get $20 of profit, and with a tROAS of 200%, you will get the cost:
- Cost = (20/200)*100 = $10
- With a $20 Phone Case, you get $10 of profit, and with a tROAS of 200%, the cost will be:
- Cost = (10/200)*100= $5
Note:
- It’s not guaranteed that the system will always meet your target. If your ads are not working due to a high ROAS set or the cost is too high for a low ROAS, you can modify the target ROAS once a week, changing it to less than 20% of the current target.
- Natural fluctuations happen day-to-day. The Target ROAS optimizes to deliver your stated ROAS goals on average over time. For example, if your ROAS goal is 500%, you might have a ROAS of 750% for a few days and 250% for other days. It will try and achieve a 500% ROAS on average over time, but be aware it won’t be 500% every day. The same could happen for the money spent. Do not react to these fluctuations. Instead, wait for one complete conversion cycle; that’s when you can get an accurate picture of the ROAS achieved.
Requirements:
- 15 conversions per 15 days
- 15 conversions per MCID in a single Google Ads Account.
- Reporting Conversion Value
How to Set Up Dynamic Search Ads
Why you should use Dynamic Search Campaigns
Dynamic Search Ads are the easiest way to find customers searching on Google for precisely what you offer. Ideal for advertisers with a well-developed website or a large inventory. Dynamic Search Ads use your website content to target your ads, and they help fill in the gaps of your keyword-based campaigns. Dynamic Search Ad headlines and landing pages are also generated using content from your website, which keeps your ads relevant, saving you time.
How does it work?
When someone searches on Google with terms closely related to titles and frequently used phrases on your website, Google Ads will use these titles and phrases to select a landing page from your website and generate a clear, relevant headline for your ad.
How to set up Dynamic Search Campaigns
Please follow these instructions to set up a Dynamic Search Ads Campaign:
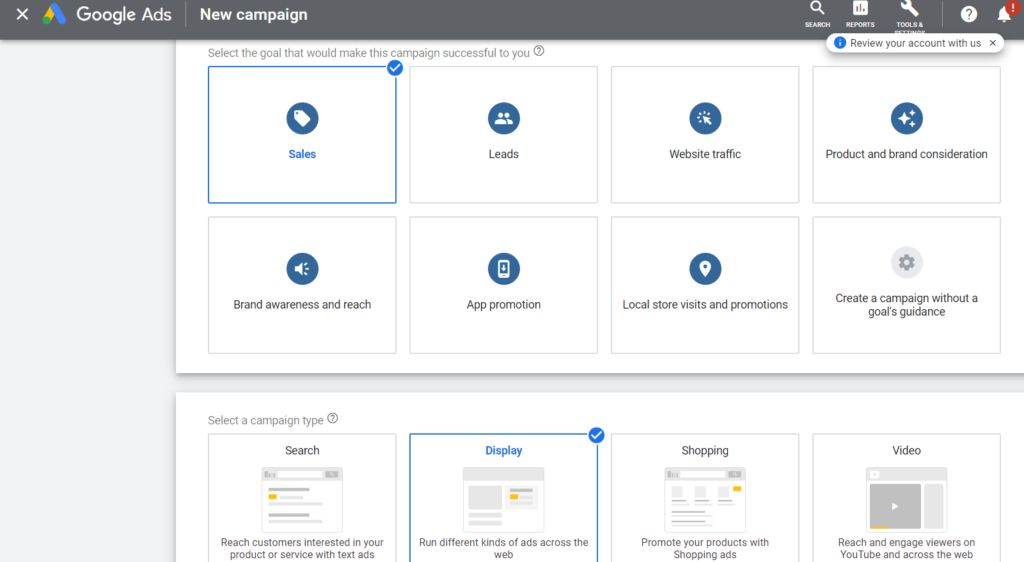
A. Create a campaign
- On the page menu on the left, click Campaigns and click the plus (+) button, then select New campaign.
- Select Sales as your Campaign’s Goal
- Select Search as your campaign type. Skip the steps of results you want to get from the campaign.
- Click Continue.
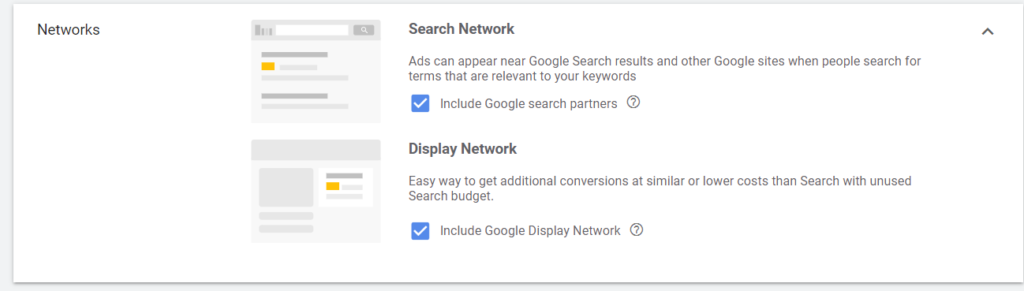
- Name your campaign and enter the locations you want to target, the languages you wish to use, and your budget. Remember to turn off all additional networks to save your money:
6. Under "Bidding," choose an automated bid strategy. If you want Google to optimize your bids, we recommend the Enhanced CPC option. If your account has enough data, you can also choose CPA.


- Enter your bid limit (optional) and budget.
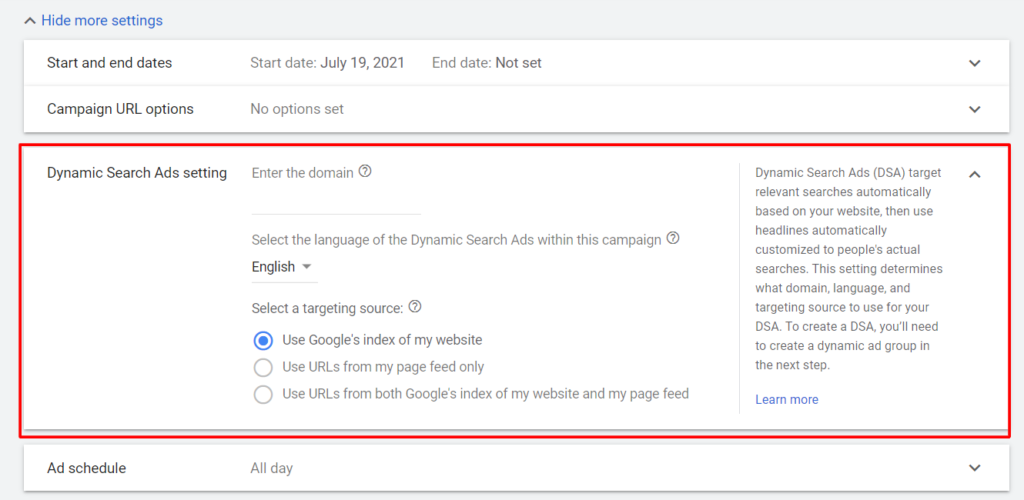
- At the top of the screen, under "General Settings," select Show more settings to expand, and then click Dynamic Search Ad.
- Enter your website domain and select your website language.
10. Click Save and Continue to continue onto the next stage—creating a dynamic ad group and targets.
Note: You will have three options in Select a Targeting Source:
- Use Google's index of my website. The system will scan all information/pages on your website to create the related ads based on users' search terms.
- Use URLs from my page feed only. This option will be available if you set up your page feed in the Business data feed (Page Feed part).
- Use URLs from both Google's index of my website and my page feed. This option combines the two options above.
In addition, you can also create some extensions to increase the CTR for your campaigns:
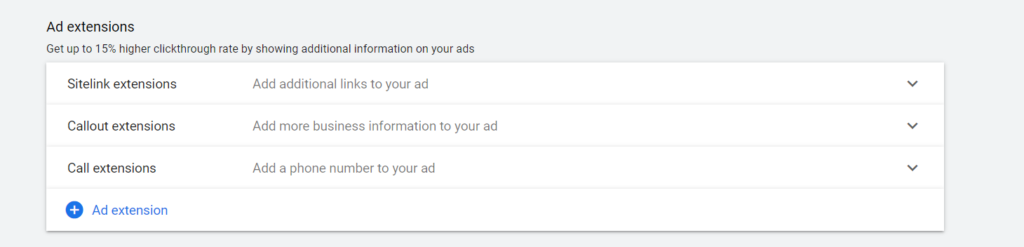
B. Create a Dynamic Ad Group
Follow these steps to create your dynamic ad group:
- For the Ad group type, select the Dynamic option (default).
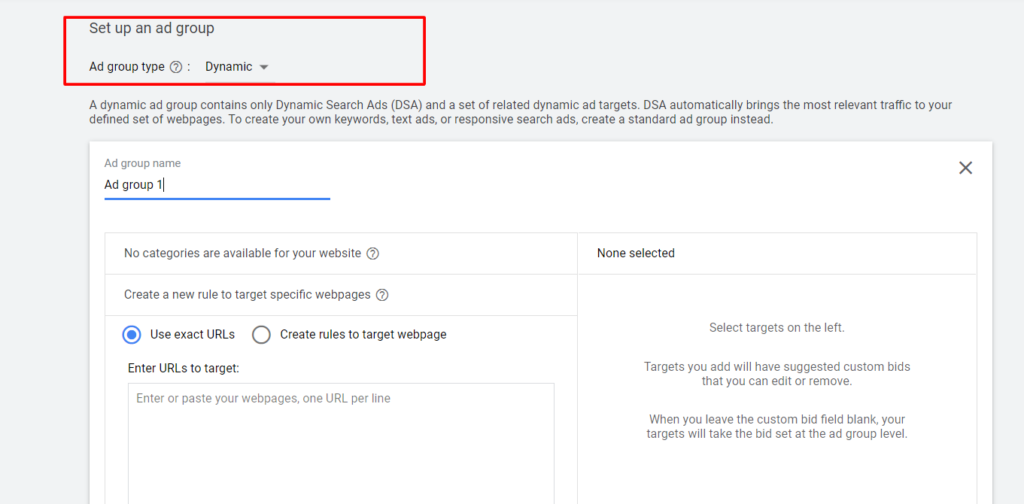
- Name your dynamic ad group.
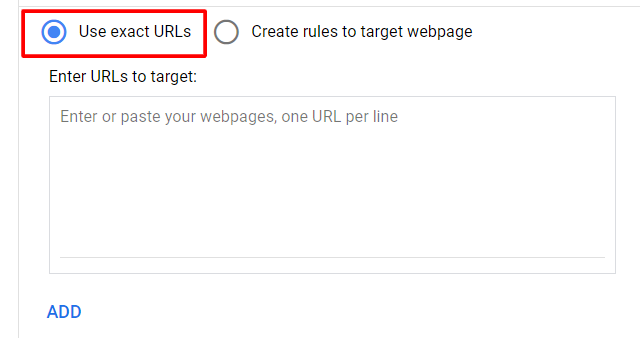
- Decide how you’d like to target your ads. If you’re unfamiliar with dynamic ad targets, we strongly recommend reading about targets for Dynamic Search Ads. We recommend to start with:
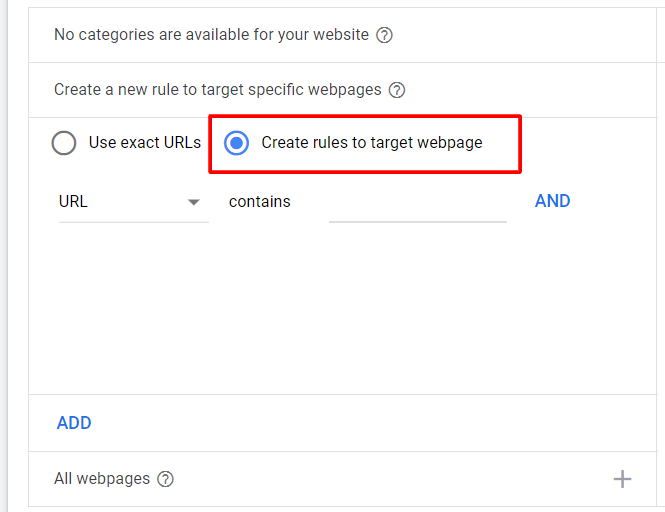
- Creating a new rule to target specific webpages, including "Use exact URLs" (use some landing pages that you want to advertise) or "Create Rules to target specific webpage" like using URLs that contain specific words (for example, URLs that contain t-shirt).
- All webpages: Use all the data from your website.
- Other categories: Sets of landing pages organized by theme. You decide which sets of pages to target, how to group similar pages and the level of granularity. If your site is entirely new to Dynamic Search Ads, it may take up to 24 hours for categories to show.

4. Click Save and continue.
C. Create a Dynamic Ad
For dynamic search ads, the system will automatically pick URLs and create headlines for your ads. But you need to provide descriptions for your ads. So, you should give the most general information about your business and the call to action in this description (for example, Free Shipping, Sales, Best quality, etc.).
After successfully creating your campaign, please wait at least 24 hours so that the system can start showing your ads.
How to Create a Page Feed
As mentioned above, you can create a page feed in the business data feed to use for your dynamic ads. Before you begin, download the page feed data template (recommended) or create your own spreadsheet with at least two columns:
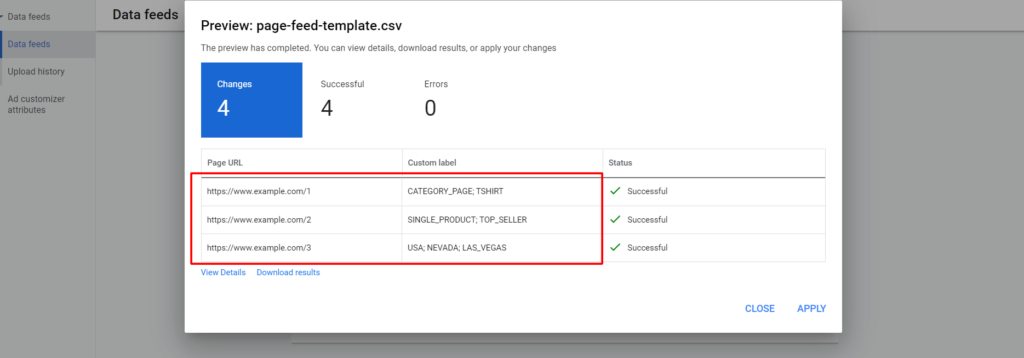
- Page URL: This is the webpage you want to target. Enter one URL per row. Don’t use URLs with added tracking parameters. Learn how to set up tracking for Dynamic Search Ads.
- Custom label: This label will help you target ads within your page feed and adjust your bid per label. Enter one or more labels per row separated with a semicolon (;). For example, you can create custom labels for T-shirts, Phone Cases, Posters, etc.
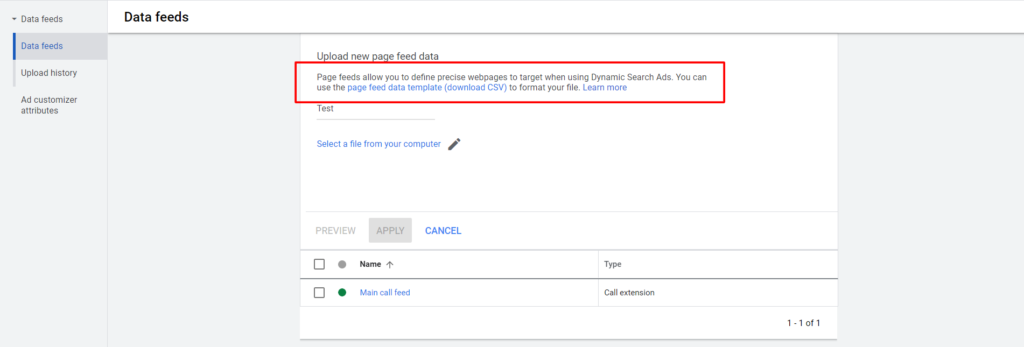
To create a page feed, you can follow these steps:
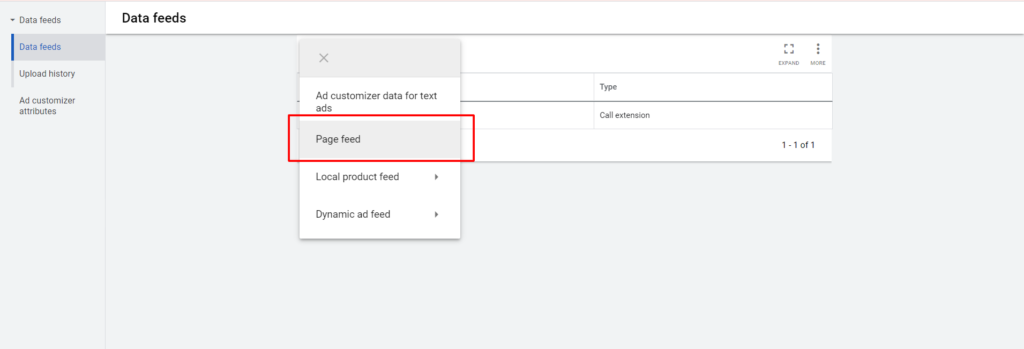
- In the upper right corner of your account, click the tools icon, then select Business data under “Setup.”
- Click the plus (+) button, then select Page feed.
- Enter a name for your feed.
- Click Choose file and attach your feed file.
- Optional: Click Preview to view a summary of what will be uploaded.
- Click Apply.
After uploading your page feed, wait at least 24 hours so that the system can review your data. After this period, you can use your feed for your dynamic search ads targeting.
How to Create an Effective Dynamic Remarketing Ad
Dynamic Remarketing helps you retarget people who already viewed or added a product into their shopping cart and haven’t completed the purchase yet. Using this type of campaign will help you increase your chance of getting sales from users. You can use this with your Standard Shopping Campaign to get more conversions before switching to Smart Shopping Campaign when your account has enough data.
Since Chip has already implemented a tracking tag for Dynamic Remarketing on your website, you only need to create a Dynamic Remarketing campaign to get started by following the next steps:
Step 1: Create new campaign > Select Sales for your Campaign’s Goal > Select Display Campaign > then click Continue.
Step 2: Fill out the required information in the setup steps.
Note: You should consider using Enhanced CPC in the beginning. This bidding strategy does not have any requirement for Conversion data but can still help optimize for Conversion.

Step 3: In the Audience tab, please only select the two audiences below:
- Shopping Cart Abandoners
- Product Viewers
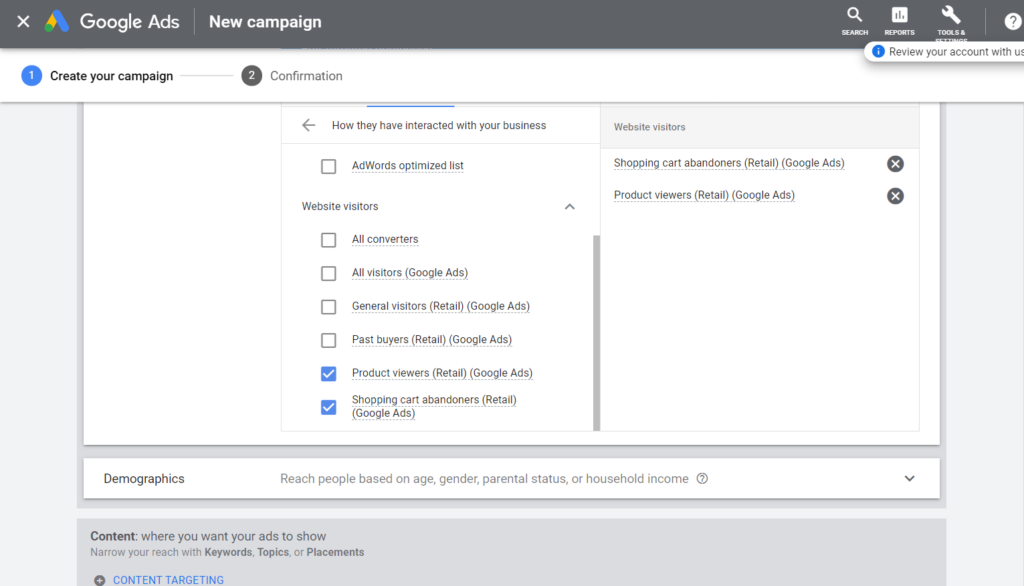
The reason to select these two audiences is that they have already seen your products, so they are potential users that are more likely to make a conversion and save you money. Also, don’t forget to switch off the Targeting Expansion. If you don’t switch it off, the system might show your ads outside the target audience, affecting your budget.
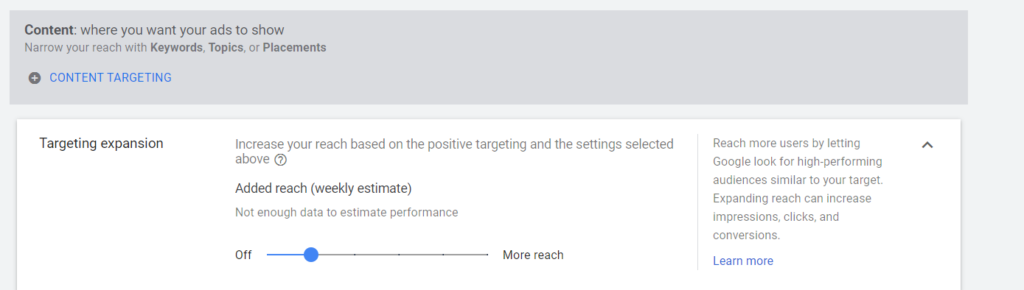
Requirement: These audience lists must have at least 300 users, Google requires 100 only, but it won’t work well. So for better performance, your audience lists should be more than 300 users.
Step 4: After completing all the mentioned information above, you can navigate to the Dynamic Ads tab, then tick the box Use Dynamic Ads Feeds for Personalised Ads. Then select the Feed from your Merchant Center account. You don’t need to select the items filter. It’s better to let the system advertise all viewed products.
Step 5: You need to create ads for your Dynamic Remarketing. You might wonder why you need to create ads when the system already made ads from your product feed, right? Well, because some advertisers will target other audiences (e.g., All Visitors) or turn on Expansion Targeting, so the system will require one general ad in case the system can detect the need. It will show these general ads to users.
After finishing these five steps, you need to wait until the system reviews your campaign and shows your ads to users. Then, if your ads are not working correctly, you can consider modifying your bidding limit to solve the issue.
The More You Know
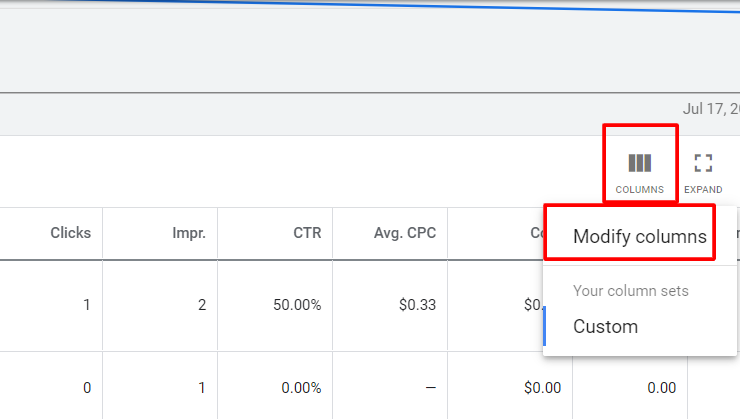
The Most Relevant Metrics in a Google Shopping Report
Data can give you great insights about your business, which is why learning to interpret different metrics can be crucial. Chip here gives you the lowdown on the most important metrics to consider in your Shopping Ads campaigns.
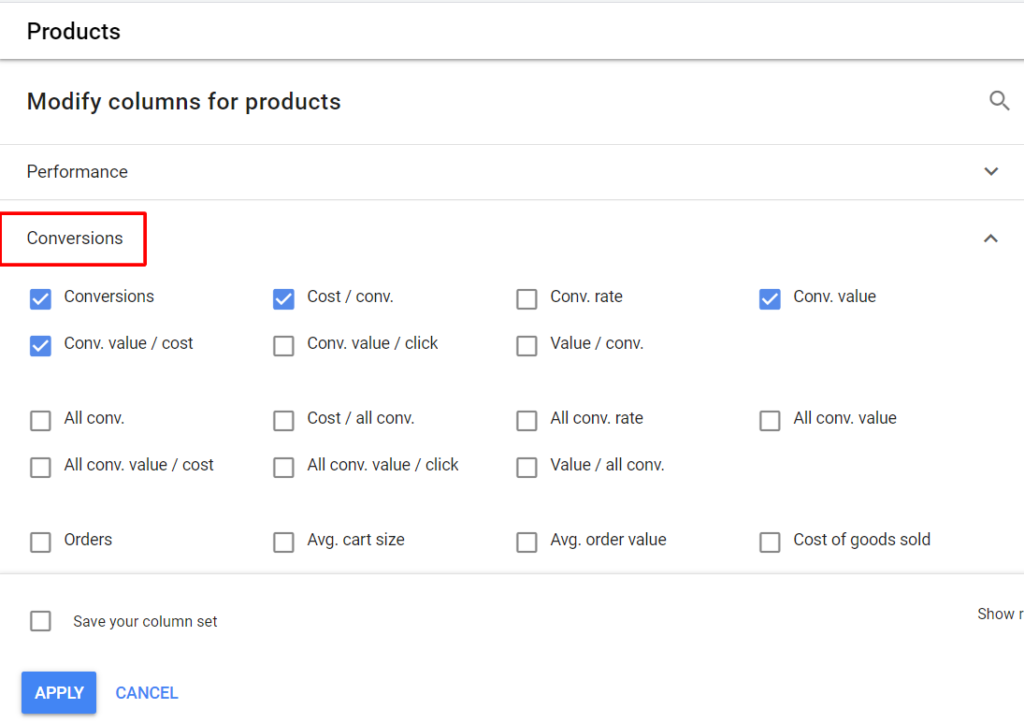
1. Conversion value
Not all conversions are equal. Some are worth more to your business than others. If you assign values to your conversions, you can use them to track and optimize your campaigns' return on investment (ROI).
2. Conversion value/cost
This metric estimates your return on investment. It's calculated by dividing your total conversion value by the total cost of all ad interactions. Use this metric to understand how much your profit is considering the cost spent in ads.
3. Cost/Conversion
This metric is not as crucial as the Conversion Value/Cost for Shopping Ads because every conversion has a different conversion value, but you can use it to understand how much you can pay for a conversion.
So why is it not as important? Well, let me show you an example:


Which one do you think will perform better?
If you only look at Cost/Conversion metrics, you will think that the first image will perform better. But if you add the Conversion Value/Cost metric, you can see that even though the Cost/Conversion of the second picture is high, the revenue the advertiser gets is even higher (x5.78). In other words, in the second picture, for every $15.88 you spend in advertising, you get $91.78 in return. Quite impressive, right?
4. Conversion rates
This metric tells you how often, on average, an ad click or other ad interaction leads to a conversion. It's calculated by dividing "Conversions" by the total eligible interactions (like ad clicks or video ad views). If this metric is low, it means you need to optimize your landing page, the product feed, the ad or the annotations to improve it.
You can see these metrics by adding them in the Overview report or the Campaign report.
5. Average CPC
It means the average amount that you've been charged for a click on your ad. Average cost-per-click (avg. CPC) is calculated by dividing the total cost of your clicks by the total number of clicks. Learning this metric will help you optimize by reducing CPC to get a better return on investment in the future.
How to set up customer reviews
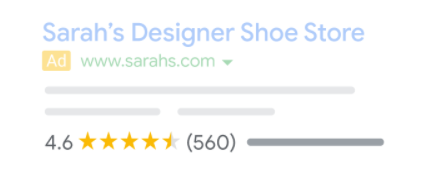
Google Customer Reviews is a program that allows customers to rate their purchase experience on your site. The rating that people give in their reviews can help other shoppers make an informed decision when purchasing your products.
If you enable Google Customer Reviews on your site, Google will email your customers a few days after they have received their orders, where they can review their entire shopping experience. If your account is eligible for Customer Reviews, your ads will show like this:
How to enable customer reviews
To enable it, you need to do the following steps:
- Log into your Merchant Center account.
- Make sure your Merchant Center account is verified and claimed.
- Click Growth in the navigation panel on the left.
- Click Manage programs.
- Go to the Customer Reviews card.
- Click Enable to sign up.
Note: Only Admin level users of the Google Merchant Center (GMC) can enable this feature.
Steps to set up and collect data
After enabling the program, you need to set up the code on your website. So, the system can let the users who completed a purchase on your website opt-in for the survey.
Before implementing the code, we suggest you read the following notes:
- The survey opt-in module's code should be placed on the order confirmation page of your checkout flow(s). All confirmation pages must use HTTPS (not HTTP).
- Because this module triggers the Google Customer Reviews (GCR) survey opt-in, the order details in this module must be accurate to the best of your ability.
- If your checkout process uses a third-party processor, it must redirect back to the confirmation page on your domain.
- Do not obscure the GCR customer survey opt-in module with any other content on your order confirmation page.
Alright, now you can implement the code on your website by following these instructions:
Step 1: Add the opt-in code for the survey. Paste the following HTML snippet for survey opt-in into your order confirmation page just before the closing </BODY> tag:
<!-- BEGIN GCR Opt-in Module Code -->
<script src="https://apis.google.com/js/platform.js?onload=renderOptIn"
async defer>
</script>
<script>
window.renderOptIn = function() {
window.gapi.load('surveyoptin', function() {
window.gapi.surveyoptin.render(
{
// REQUIRED
"merchant_id": "MERCHANT_ID",
"order_id": "ORDER_ID",
"email": "CUSTOMER_EMAIL",
"delivery_country": "COUNTRY_CODE",
"estimated_delivery_date": "YYYY-MM-DD",
// OPTIONAL
"products":[{"gtin":"GTIN1"}, {"gtin":"GTIN2">}],
"opt_in_style": "OPT_IN_STYLE"
});
});
}
</script>
<!-- END GCR Opt-in Module Code -->
Step 2: GCR badge opt-in. Add the GCR badge to your site by pasting the following HTML snippet right after the code survey opt-in:
<!-- BEGIN GCR Badge Code -->
<script src="https://apis.google.com/js/platform.js?onload=renderBadge"
  async defer>
</script>
<script>
  window.renderBadge = function() {
    var ratingBadgeContainer = document.createElement("div");
      document.body.appendChild(ratingBadgeContainer);
      window.gapi.load('ratingbadge', function() {
        window.gapi.ratingbadge.render(
          ratingBadgeContainer, {
            // REQUIRED
            "merchant_id": MERCHANT_ID,
            // OPTIONAL
            "position": "POSITION"
          });
     });
  }
</script>
<!-- END GCR Badge Code -->
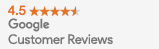
Your ads will look like this:
Step 3: Add the language code right after the GCR badge code:
<!-- BEGIN GCR Language Code -->
<script>
window.___gcfg = {
lang: 'LANGUAGE'
};
</script>
<!-- END GCR Language Code -->
The information in bold is the custom information that needs to be changed based on your website. You can read this article to find more details.
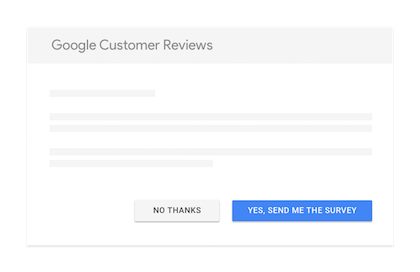
After implementing, users will see the survey like this:
When will the Customer Review badge show?
When you successfully set up the tag on your website, the system will pop up the survey request whenever a user completes an order. If a user accepts the survey request, the system will generate a survey and send it to their email when they receive the products, based on the shipping time.
Product Ratings Program
If you get around 100 completed surveys within 12 months, your account might be eligible for participating in the Product Ratings Program.
Note: The Search Network only displays 3.5 points ratings.
Aside from their survey reviews, Google also sources feedback from the following independent review websites:
- Ausgezeichnet.org
- Bazaarvoice
- Bizrate Insights
- eKomi
- E-Komerco
- Feedaty
- Feedback Company
- Feefo
- Hardware.info
- Heureka.cz
- KiyOh
- Klantenvertellen
- kuchikomiking.jp
- Poulpeo
- PowerReviews
- ProductReview.com.au
- Reputation.com
- ResellerRatings
- Reviews.io
- Reevoo
- Shopper Approved
- ShopVote.de
- ShopAuskunft
- Sitejabber
- Trusted Shops
- TrustPilot
- Verified Reviews
- Yopi.de
- Yotpo
If you have enough reviews from these sources (at least 50 reviews), you do not need to set up the Google Customer Review Survey. Instead, you can collect data from these sources to register in the Products Ratings program with the Product Ratings Interest Form.
Free Product Listings
What are the free product listings on Google?
It’s a feature where retailers are eligible to show their products across different Google surfaces, similar to paid ads but for free. To access free listings, you need to be registered in the Google Merchant Center. It will display your products in Google Search, Google Images, the Shopping tab, and Google Lens.
How to set up free product listings on Google
All existing shopping advertisers who have submitted product data (via feed or API) automatically opt-in to show their products across Google surfaces.
Once you created a product feed that targets the US, you can activate free product listings by following these steps:
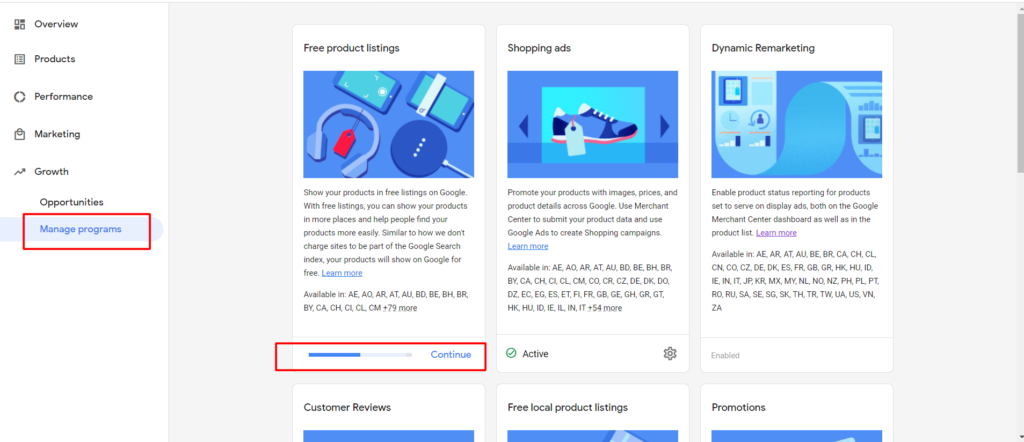
Step 1: Go to Growth > Select Manage Programs, then navigate to Free product listings and select Get Started or Continue to setup.
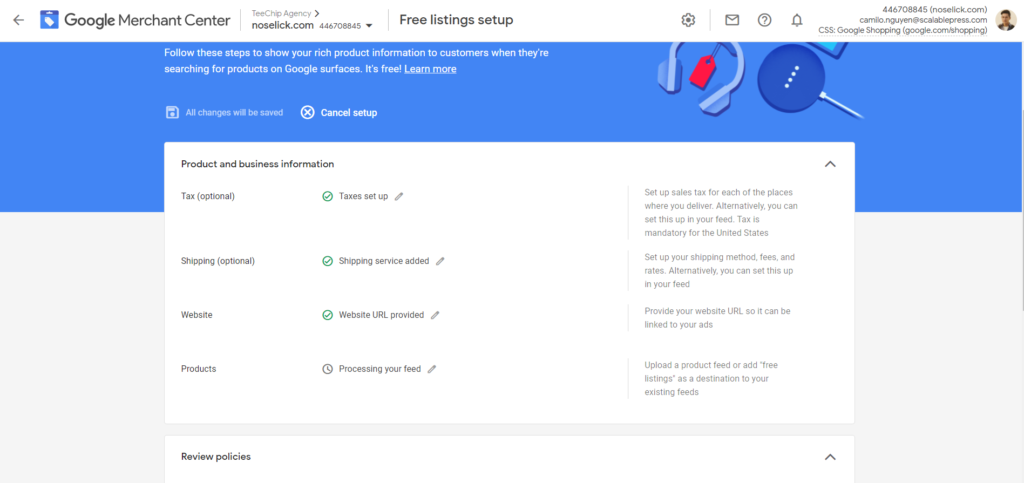
Step 2: Follow the setup steps from the system. Chip has already filled in the Shipping and Taxes sections for your account. So, you only need to wait 24 hours for the system to update your feed to complete the setup.
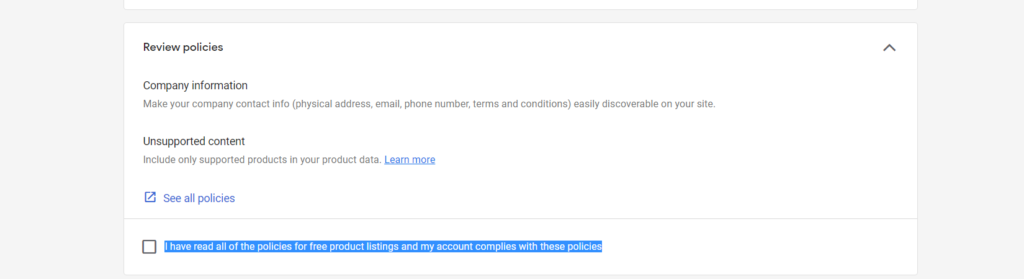
Step 3: After 24 hours, go back to the Free listing setup and tick the box “I have read all of the policies for free product listings, and my account complies with these policies.”
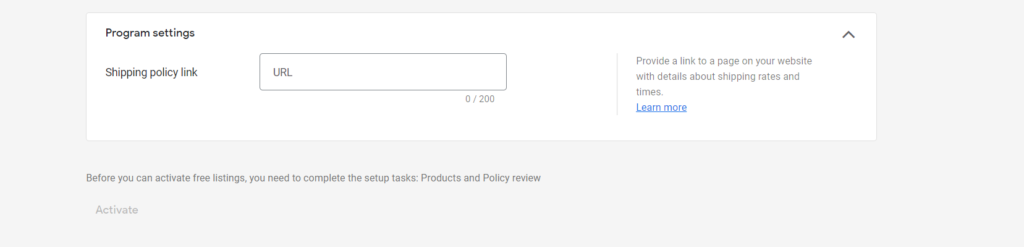
Step 4: Add the Shipping policy link in Program settings and select Activate to complete the setup process.
To add specific destinations to the products in your feed, you can refer to this article.
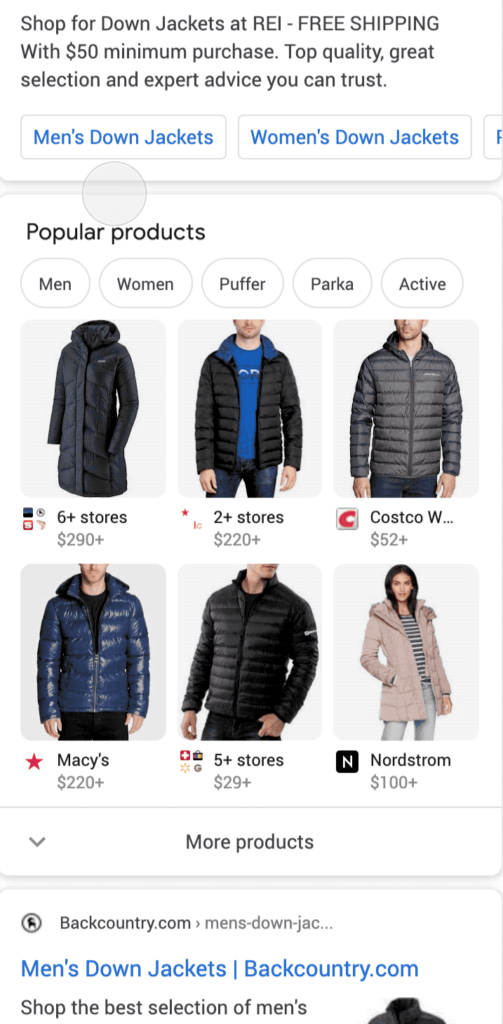
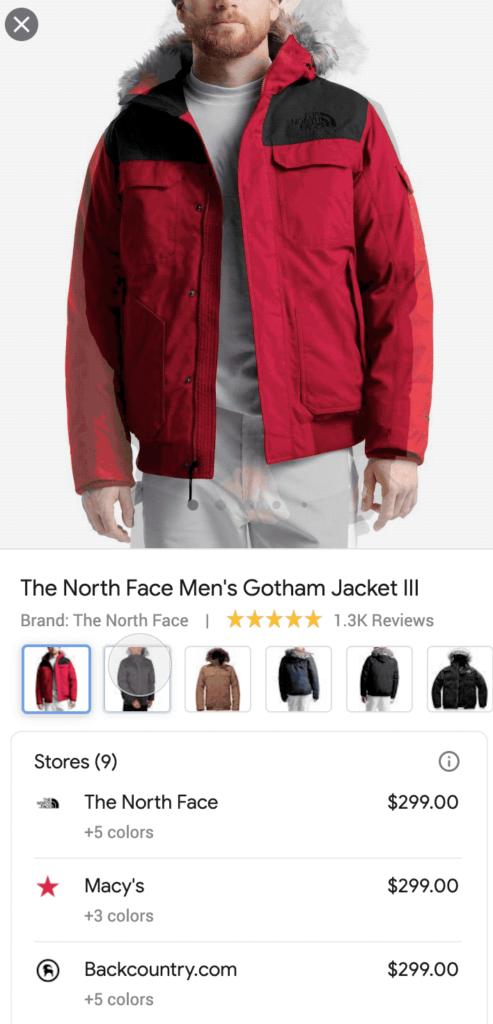
How will products be displayed in Free Listings?
Your products will be displayed in the Search, Shopping, and Image Tab as indicated below:
Popular Products tab
Shopping tab
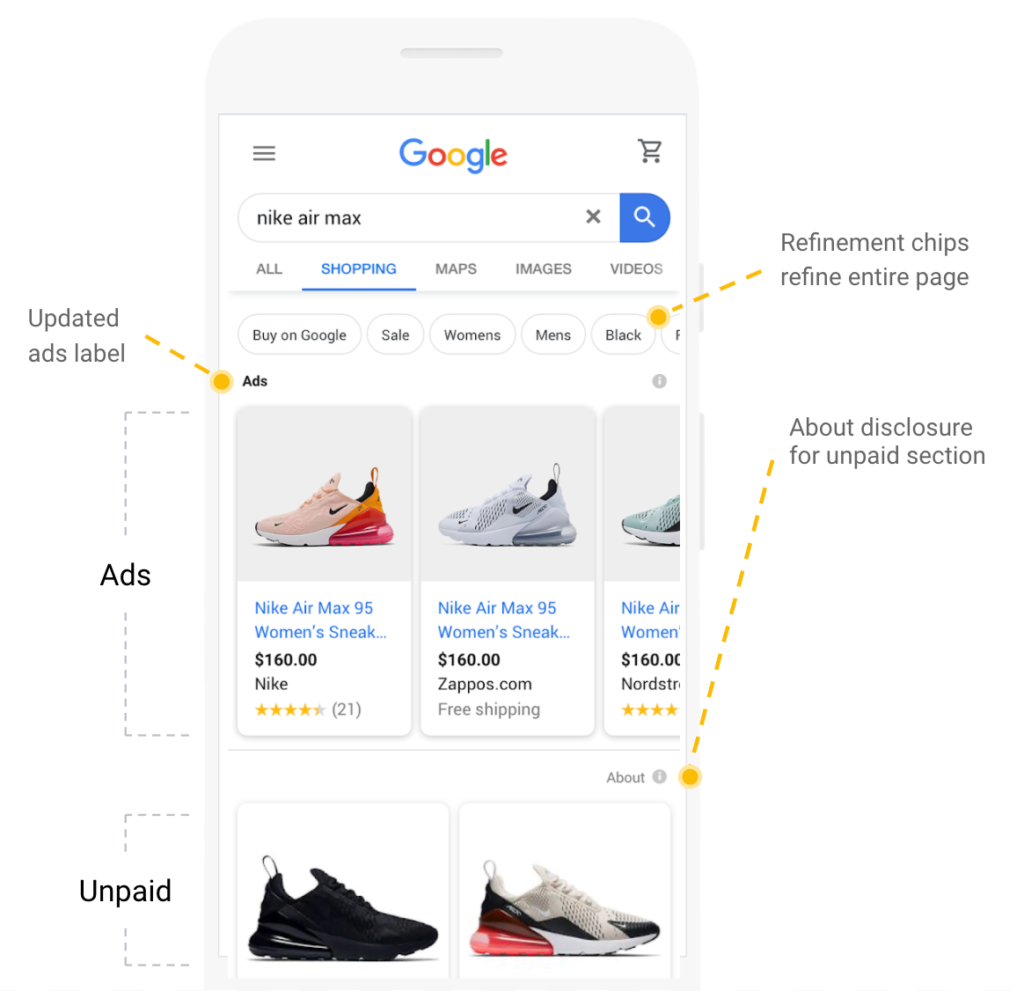
Image tab
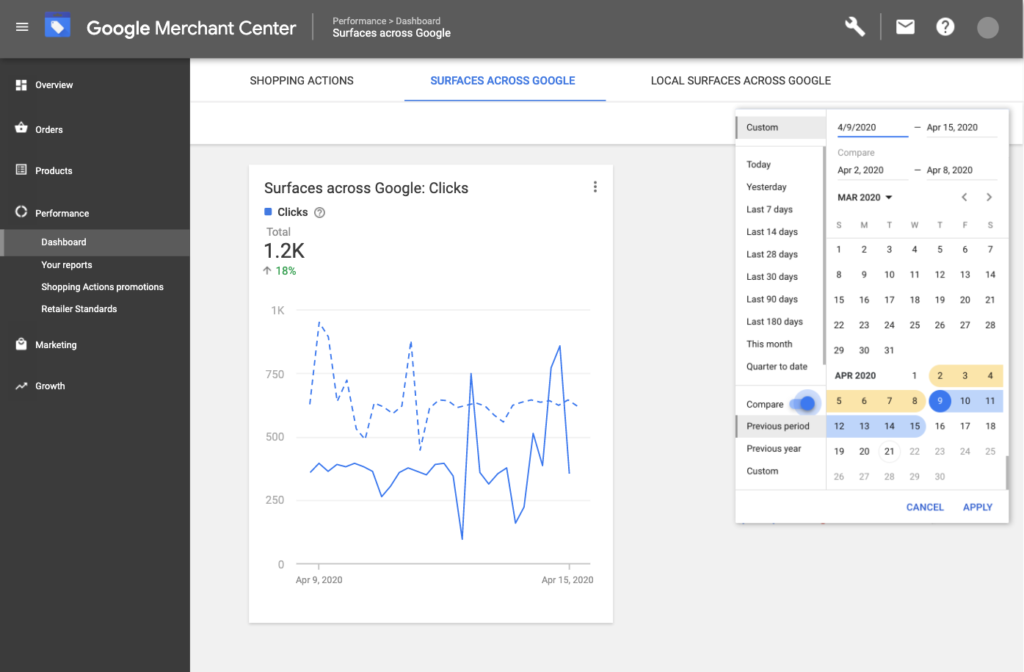
How to view analytics and reports
With free listings, you can see Clicks and Impressions data in the Google Merchant Center. Follow these steps to see the Free Listing data:
- Log into your Google Merchant Center account and select Performance on the menu located on the left side.
- Select Dashboard to see the Free Listing data.
Annotations in Shopping Ads
Annotations are additional information displayed in Google shopping campaigns to entice potential customers to buy your product. Currently, Shopping Ads have these annotations: Free Shipping, Price Drop, Return and Refund Policy, Sale Price, and Promotion.
Order of importance for annotations
Annotations are not always displayed in your ad. Google follows certain standards to determine what type of annotations to show on each Shopping ad. Currently, Shopping ads annotations will be prioritized in the following order:
- Minimum Order Value
- Currency Converted Value
- Installments (US only)
- In-store offers (where available)
- Condition (ex: “refurbished”)
- Price Drop (can trigger if the price has dropped at least 15% below its 90 day average)
- Sale/Promotion (% or $ off)
- Sale/Promotion (other than % or $ off)
- Sale Price
- Product Reviews
- Estimated Delivery Date (EDD)
- Free Shipping
- Free Shipping Threshold
- Trust Data: Return Policy
Note: These apply to all countries except Germany. Annotations only apply in the country where they are launched and they are subject to change at any time.
How to set up Annotations
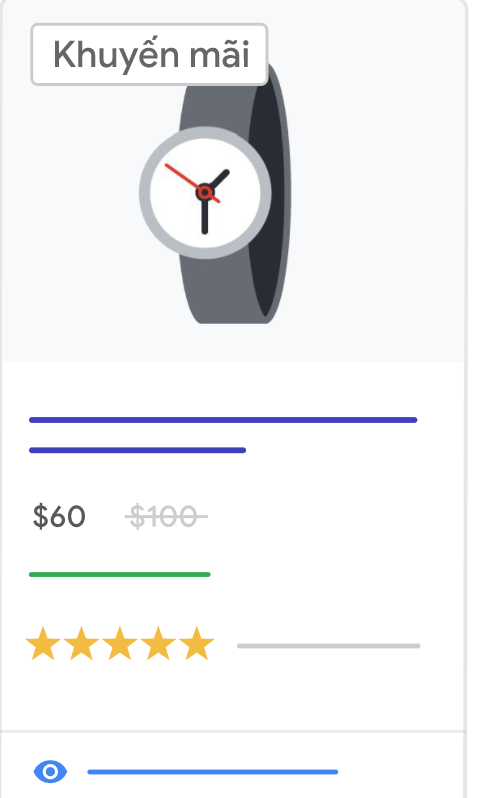
A. Sale Price
First, you need to submit the original price for your item using the price attribute. When you lower the price of an item for a sale, you should submit the sale price using the optional sale_price attribute. The original price must be submitted using the price attribute, even during the time of the sale.
If you set it up correctly, your ad will look like this:
Requirements:
In order for your product to show with sale price annotations, you need to meet the following requirements:
- The base price, or the higher price, must have been charged for a period of 30 days in the past 200 days (It doesn’t need to be consecutive).
- The base price must be valid.
- The sale price must be lower than the base price.
- The discount of the sale must be greater than 5% and less than 90%.
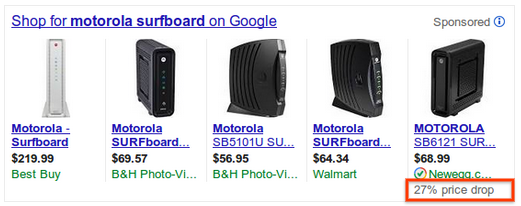
B. Price Drop:
Many user studies show that price is one of the most important factors for users when buying products. To that end, Google sometimes displays an annotation when the price of an item has dropped below its 90-day average. This is not an opt-in feature but is something Google does automatically. Google will only trigger a price drop if there is a change in the price_attribute, where the price is some X% below the 90-day average.
C. Promotion
Use promotions to highlight the benefit of purchasing from your store when shoppers decide where to buy. Shoppers can see your online promotions on Shopping ads as well as free product listings appearing on the Shopping tab in the US (it may also appear outside the US as well)—whether they’re on a mobile or a desktop device.
Currently, GMC provides the following types of promotion:
- Discounts: Percent off, cashback, buy one get one free, or buy one get 2nd percent off
- Free gifts: Free item or free gift card for a specified value
- Shipping: Free or discounted shipping
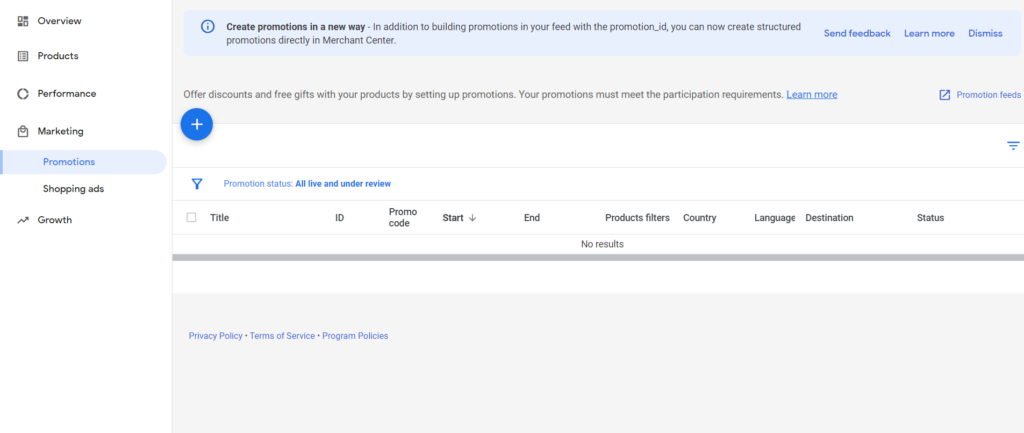
In order to create a Promotion, you can follow this instruction:
Step 1: Register using this form.
Step 2: After registered successfully, you can click on the Marketing tab located on the left side > Choose Promotions > Add new Promotion.
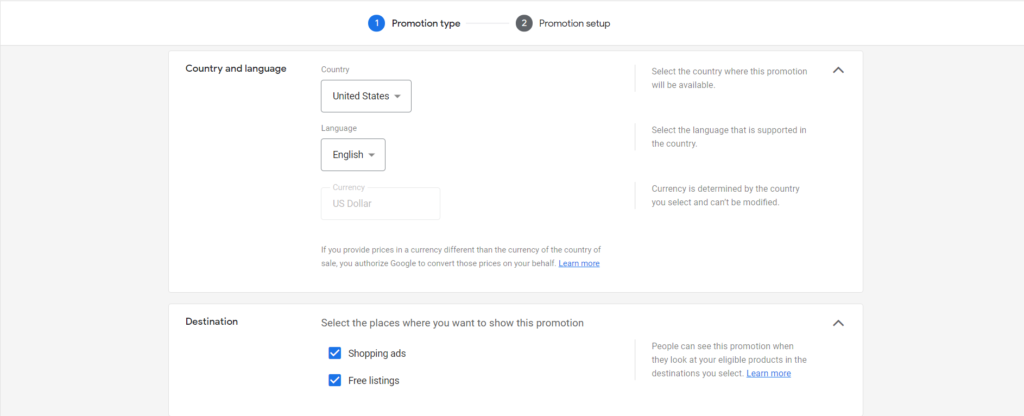
Step 3: Select the country and language you want to apply for your promotion.
Step 4: Select the Promotion category you want to apply, there are 4 types: Amount off, Percent off, Free gift, and Free shipping.
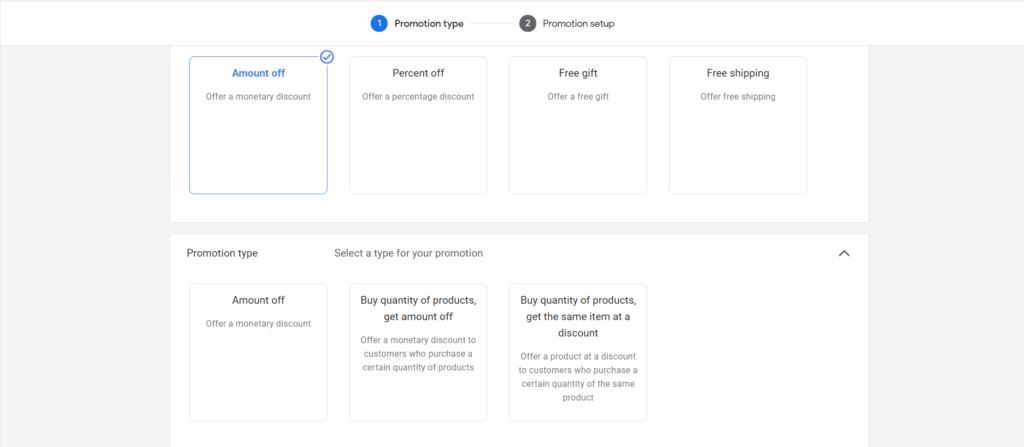
- In Amount off, there are three types of promotions:
- Amount off. For example: If users purchase an order above $100, they get $5 off.
- Buy X number of products, get an amount off. Buy 3 products in the same order, get 5$ off.
- Buy a number of products, get the same item at a discount. Buy 02 T-Shirt ID 01, will get 10$ for the next order on T-Shirt ID 01.
- Percent-off will be the same as Amount off, but instead of a decrease in the amount of money, the promotion will be applied in a percentage %. Decrease 10%, 20%.
- In Free Gift, there are three types of promotions:
- Get a free gift. For example: With orders above 100$ customers will receive a free hand sanitizer.
- Get a gift card. With an order above $100, receive a $10 coupon.
- Give a free gift from your inventory. With orders above $100, receive a free T-shirt ID 01.
- In Free shipping: Offer free shipping for specific orders or specific amounts.
Note: You need to follow the Shopping Ads Promotion policy when setting up promotions to avoid violating policies, otherwise you can be suspended from the system. For more information, please refer to this article.
D. Free Shipping
In order to display the Free Shipping label in your Shopping Ads, you need to set up shipping information in your account level as Free Shipping (Shipping fee = 0) for all your items or for orders with X USD.
Follow these steps for setting it up:
- Step 1: Log into your Google Merchant Center (GMC) account and go to Tools & Settings.
- Step 2: Select Shipping and Returns > Add new Shipping Service.
- Step 3: In Service Coverage, select the country you want to deliver your product and follow the system’s guidance. Then select Next. Tip: You can select multiple countries using the same shipping fee.
- Step 4: In Delivery Times, fill out the information that the system requires.
- Step 5: In Shipping Cost, select Free Shipping if you want to use Free Ship for all of your products or Free shipping over a certain amount if you only want to apply for orders with X USD amount. For example: If you want to apply free shipping for orders above $100, you can set up: For order price below 100 USD, charge 15 USD. After completing the process, you need to wait 48 hours for the system to apply your change.
E. Return Policy
To set up the Return Policy annotation, you need to add a Return Policy to your GMC account, then follow these steps:
- Step 1: Log in to your GMC account, Select Tools & Settings
- Step 2: Click Shipping and returns > Choose tab Returns Policy > then Add Policy.
- Step 3: Select the countries to apply the Return Policy. Then you can paste the Return policy URL of your website and fill out the required information to complete the setup.
Note: The Return Policy annotation will not always be shown. The system only shows this annotation if it’s eligible.
Please refer to this article for more information.
How to Choose Dropship Products for Google Ads
The following products should not be promoted on Google Shopping:
- Dangerous products: Guns, weapons, protected laser lights, knives (if you are selling cooking knives, please state it clearly on the landing page)
- Healthcare products: While these products can still be shown in Google Shopping, they will undergo strict review by Google. To avoid account suspension and affecting other products, you should seriously consider whether promoting healthcare products is necessary.
- Counterfeit products and authentic brand-name products with low price.
- Do not use descriptions with miracle uses. For example, “Use this product only for 3 minutes for perfect skin.” This type of information will seriously impact your Google Ads account.
- Spy cameras and audio recorders that violate privacy. These are considered devices that enable dishonest behavior.
- Products that contain sensitive content(blood, nudity, violation of rights, etc.) and politically-sensitive content, hate, and discrimination.
- Do not promote live animals, animal cruelty, or the like.
For more information, refer to this article.
Image requirements:
- Use high quality images that concentrate on the products with minimal background assets. Do not use images with TM or watermarks on the images, unless this information is part of the product itself.
- Avoid using before and after information in the image or descriptions. This relates to the suspension citing misrepresentation.
Landing page structure:
- Your website should be structured such that you are not copying products from multiple providers with no modifications. The structure of the description might be:
- Part 1: Product introduction
- Part 2: Product usage
- Part 3: Product details (Material, size, colors, etc.)
- Use the same font size and style throughout all your product pages.
- Classify product types in order to manage products easier
About title and description:
- For apparel, do not use terms like“luxury” or“big brand.”When explaining product materials for jewelry and accessories, for example, do not use words like“diamond” and“gold”and assign a low price to the product. It will be considered a counterfeit product.
- Do not use clickbait content or false(even true) claims/guarantees, such as“limited items available,” “unique designs only for you,” “not available in store - only available on this website,” “100% guarantee happy,” etc.